Audio and Microphone Noise
Information and Equipment for Recording Wildlife
Understanding Terms of Audio Measurements
Here, we will briefly explain, in the simplest terms possible, what noise and sound are, how they are measured, different types of equipment in use and their limitations, and how noise can be managed and reduced. This information is intended to be of a practical value for those who need results in an outdoor environment, and needless detail will be minimized. In the audio realm, the term noise is used to describe many different phenomena, but noise is simply all the sounds you do not want in your recording. Sound is a longitudinal pressure wave that travels through air, characterized by its frequency, which is the number of pressure pulsations per second (Hertz), and its amplitude which is the sound pressure level. These actual pressures are very, very small and usually measured in dB SPL (Sound Pressure Level). 94dB SPL is 1 Pascal and is a commonly used SPL reference to spec microphones. 1 Pascal is loud, like someone yelling in your ear from a foot or two away, but it is only .000145 PSI of sound pressure. Atmospheric pressure is almost 15 PSI or 100,000 times higher by comparison. As distance increases from the source, the SPL decreases proportionally since the wavefront spreads out in 2 dimensions. For example: The output of a 120dB siren at 1 meter, will only be 100dB at 10 meters, 80dB at 100 meters, and 60dB at 1000 meters. Therefore, a sound source SPL is specified in dB at a given distance of typically 1 meter.
What is a DB
The dB can take some time to appreciate, but eventually you will like it. Mathematically the dB is logarithmic, and can be used to relate any two values. In case you forgot your High School Algebra, logarithmic values are added and subtracted to represent multiplication and division. A negative dB value just means the signal is less than the reference value. For example, if you have an amplifier that multiplies sound signals by 10, you just add 20dB to the input value in dBs. Likewise, the signal level after a 20dB attenuator is found by subtracting 20dB. For reference use, to calculate dBs with any known value and a reference value: dBs = 20 x Log10 (Value / Reference Value). The reference value for SPL is 20 uPascals, which is the typical limit of good human hearing at 1KHz, and this is therefore equal to 0dB SPL. If you remember the following useful things, you will do okay whether you understand dBs and math or not: Something that is 10X is 20dB, 100x is 40dB, 1000x is 60dB, and so on for each decade. Triple is 10dB, double is 6dB, 3dB in sound level change is barely noticeable, 1-2dB differences are negligible, and 0dB means there is no difference. 0dB SPL is the limit of good human hearing, which is about as loud as a mosquito at 10 feet. Don't be surprised if you can't hear one till 3 feet or about 10dB SPL. A very quiet room is around 20dB SPL. A typical meeting is about 60-70dB SPL. A busy roadway is about 80-90dB SPL. A gas chain saw or car horn is about 110dB SPL at 3 feet. 120dB SPL is very annoying, and can cause rapid permanent hearing damage, examples are a car horn from a foot away or a nearby Harley motorcycle.
Human Hearing Capability
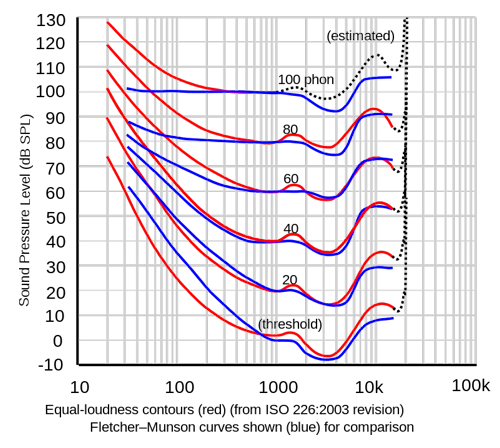
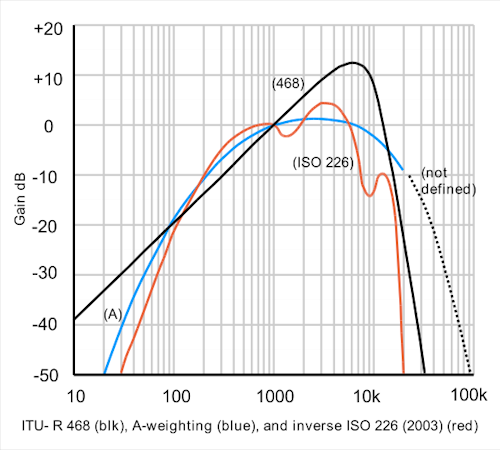
The human ear does not hear equally at all frequencies, and the frequency response changes at different levels of volume. See the graph below. The ability to hear 0db SPL is only over a narrow frequency band of a few KHz. You must also be in a quiet environment for a while before your ears obtain full sensitivity. As frequency increases, especially as you age, sensitivity decreases dramatically. Frequencies below a couple hundred hertz are also not heard well at all, ears have absolutely horrible fidelity and everyone's hearing is also a bit different. Since the noise energy from microphones and electronic equipment is often close to classical white noise, where energy is constant at all frequencies, your ears will not notice as much noise as an electronic measuring instrument that has a perfect accuracy over the audio bandwidth of 20Hz to 20KHz. Audio Engineers therefore developed the term dBA, the A denotes A-weighting, which corrects the measured values to what a typical ear would hear. DBAs are therefore very useful, as these good engineers intended, and are the specifications you would be interested in comparing. Always compare dBAs to dBAs not dBAs to dBs – the difference is usually 4-5dBs lower for the dBA value. For example, a preamp may have an EIN specification of -120dBA and only -115dB, simply because the ear does not hear all the noise that is there.
Noise and SNR
Noise, whatever its source, can be expressed as a signal level and given an SPL value just like a sound source. Another important term is SNR. SNR (Signal to Noise Ratio) expresses the ratio of how much larger your desired signal is compared to the unwanted noise – usually in dBs. You can pick out and understand a voice with a SNR of 0dB or unity, but any usable recording needs 40-60dB SNR, more is always better and is a major goal of every Audio Engineer. Noise sources can be put into two main groups, Acoustical and Electrical.
Acoustical Noise
Acoustical noise consists of actual sounds made naturally or by various nearby equipment in operation. The quietest outdoor environment is at least 10dB SPL due to rustling leaves, wind currents, and contributions from distant sources. Even miles from traffic and towns, SPL from man-made sources can still be 20-30dB. Low frequencies are even more pervasive, but can often be removed with a rumble filter during editing. Sometimes an inverted atmosphere or low pressure can increase distant sounds substantially by addition of a direct skyward reflection; the ground wave is naturally attenuated by interference with terrain features. Low-level recordings are not practical within a mile or two of normal traffic, and you will also have to wait for any air traffic to clear or edit the airplanes out later. Over 10 miles may be required to eliminate some obnoxious sounds like trains, trucks going up hill, jets, or Harley motorcycles.
Methods of Noise Free Acoustic Gain
Most nature sounds would be considered low level recording. This is why noise sources and eliminating noise as much as possible is important when recording the sounds of nature. There are some ways to actually increase the sound signal without increasing electrical noise. Parabolic microphones give a gain of 6-35dB of noise free accoustic gain by the remarkable ability of a parabolic surface to concentrate sound to a focal point. This is why parabolic microphones are indespensible for recording wildlife and in law enforcement surveilance. Another method of obtaining free accoustic gain is a pressure zone of boundary plate. This essentially means placing a microphone within 0.035 inches from a flat surface. Each flat surface can provide 6dB of accoustic gain. So, if you have two plates 90 degrees perpendicluar to each other, you can get 12dB of gain. Three plates in a box corner can yeild 18dB of accoustic gain. The boundary plate also apertures down the polar response of the microphone, which could also help in reducing unwanted sounds from the rear and side. The Wildtronics SAAM (Stereo Amplified Array Microphone) makes use of boundary effects to increase acoustic sound to the microphones, thereby decreasing the noise of the system.
Outdoor Noise Sources
Jet planes seem everywhere today, but do travel favorite routes and often on a schedule, so you can sneak in an opportunity if you are patient or move 10 miles in the right direction. Traffic noise from highways can travel great distances. You may need to be more than 10 miles aways from highways and railroads to reduce the background rumble and hills in the environment can help absorb the unwanted sounds. One thing that can ruin a good recording is the noise that you make yourself. These noises can be handling sounds, breathing, clothes rubbing, your feet squirming, a dreaded sneeze, or even little chirps giving off by your equipment. The solution is to keep your distance, remain vigilant and aware of the slightest possible disturbance you may be making, use a tripod whenever possible, and put your cellphone in silent mode. Choose the location carefully too, avoiding creeks unless you want them, falling debris from trees, noisy-leaved trees like aspen, and even be alert for some noisy little rodent taking great delight in ruining your recording. Try insect repellent near your mics, not on plastic or into the mic though, to ward off whining gnats and mosquitoes. Wind energy not only causes noise in the environment, but can often saturate an unprotected microphone at less than 5MPH. It is always best to record in winds of less than 5MPH so the effects of winds through tree leaves and such do not create a white noise background sound. The first line of defense for wind is the usual foam cover, which will help some. For outdoor use, you will also likely need a more expensive secondary wind sock, which helps more. Look for one that has an air space between the inner foam cover and outer cover, and make sure you get wind speed ratings from the manufacturers for comparison before you plunk down your money. It is probably not practical to attempt quality work in winds much over 10-15MPH since background noise from leaves goes way up.
Electrical Noise from Mics
Electrical noise is also a major factor in audio. For low-level audio work, microphone self-noise is the primary limiting factor. As previously mentioned, the acclimated human ear is good to about 0dB SPL, although many of us have lost that ability. The best mics in the world are in the 3 to 10dBA self-noise range, and many of the others are 10-20dBA – this simply means that if you put the microphone in a noiseless environment, the mic will still have a noise output representative of a sound at that SPL. This self-noise is caused by internal FET circuitry, limitations in diaphragm material science, internal circuit resistance, and a tiny bit of air molecule Brownian motion. So after spending a thousand dollars on a microphone, it is still no better than your ear! Disappointing but true, since good mics are close though, and true white noise can be partially removed during post editing by 5-15dB with noise reduction software. The end result will still rival the best ears, requires no acclimation, and can surpass what most of us could hear at the scene. For nature recording, a microphone self-noise should be less than 10dBA.
Array Microphones
Array microphones are multiple microphones that make use of the principle that multiple signals can be added to produce a larger signal, but since noise adds with a square-law function (see equation below), the SNR keeps increasing as you use more and more microphones. There is no limit to how much improvement you can obtain, except maybe until you run out of room or money. Of course, great care must be taken to make sure all the array microphones are in perfect phase, or only sophisticated signal processing can hope to recover the desired audio. The improvement in SNR obtainable or apparent decrease in the array mics self-noise is equal to 10 x Log10(N), where N is the number of mics in the array. For example, an array of 16 mics will see an amazing 12dB improvement, and even 4 mics will get you 6dB! For example: A 4-channel mixer could be used to sum 4 mics together, converting the 4 low-cost 12dBA mics into a 6dBA super mic.
Amplifier Noise, EIN
State of the art electronic amplifiers are currently capable of achieving an EIN about 20dB below the noise from the best microphones, and therefore should never be a primary contributor of noise for you. However, that said, low quality preamplifiers, mixers, and recorders abound, and are often the major source of electrical noise. Electrical Engineers define amplifier electrical noise by a different method than microphones, still in dBs, but with a different reference value. The new reference is line level, which is equal to .775Vrms. For example, a preamplifier with an EIN spec of -120dBU has 1,000,000 times less noise than line level of .775Vrms; which results in .775uVrms of noise which will appear at the input of the amplifier.
Comparing EIN and Mic Noise
Now, in order to compare, we have to convert your mic noise spec to the same terms as the amp, so take your mic's sensitivity in dB at 1 Pascal, and use this equation to calculate the electrical noise level: dB MicENoise = Mic Self Noise – 94 + Mic Sensitivity in dBs. DBAs again are commonly used. If the mic self-noise is not stated, it is also equal to 94-Mic SNR if SNR is stated instead. If you do the calculation, great, we will offer guidelines either way though. You will want your preamp or recorder to have an EIN about 6-16dB lower than the dB MicENoise as calculated above. Because noise adds together as a square-law function: Ntotal^2 = (N1^2 +N2^2+N3^2), the weaker noise source rapidly becomes negligible. If you choose to skip all the math, generally a good preamp should have less than -125dBA EIN, and when combined with a higher output (20-30mV/Pascal) microphone design; the amp will not cause any noticeable increase in noise even when used with the best (7dBA) low-noise mics. EINs lower than -125dBA are usually intended for use with lower output type mics including dynamic, which you should avoid. Amplifiers with less than -133dBA are not offered, and not really needed anyway since the mic dominates the noise floor. State of the art electronics, which is not found in audio equipment, but common in instrumentation elsewhere, can currently obtain -142dBA EIN at room temperature, and can beat the best mic's noise floor by a factor of 10x or 20dB. If you calculate that you need an EIN of less than -125dB, your recording situation is impractical or you will need a higher output microphone such as a parabolic type.
Utilizing Low Cost Recorders
If your recorder does not offer or state EIN or the EIN is greater than -125dBA, you can often use a quality preamp with a good EIN to boost the level so the recorder's noise does not matter. Quality work is usually assisted by a preamp and mixer anyway to get decent signal levels. Many compact recorders do publish reasonable EIN specs, but only at max gain, so you may find in actual use that you need the preamp anyway at lower gains. The Wildtronics Amplified Microphone models include a built-in low-noise electronic amplifier that can be used to improve the performance of low-cost recorders, allowing you to make professional quality recordings with very little effort or knowledge. An optional (1oz) Mini Accessory bar can even mount your recorder right on the dish handle for speedy deployment. You just point the dish, maybe adjust the gain knob, hold still, and instantly record. This is a great way to capture fast moving subjects, and also dramatically boost productivity. Many would also enjoy the convenience of directly connecting headphones to the Amplified dish so they can enjoy real bionic ears. Don't spend a lot to gain a couple dB advantage, a couple dB is barely noticeable, go after the big gains. These little recorders can do a great job, when paired with a Wildtronics Amplified Mic. One other issue comes to mind, put your recorder in the refrigerator and freezer, and test it before you find out later that it won't work when its cold outside! Send it back, if it fails the test, no modern circuit should have this problem, but some do. Wildtronics has already approved their products down to at least -10 degrees F and up to 140 degrees F.
Mics in Humid Environments
Another issue with microphones, that may be a problem in higher humidity environments, is condensation. It can reveal itself as a gain loss or a cracking sound, and is usually caused by placing a cooler mic into a warm humid area, but a shift in outdoor temperature below dew point or getting the mic wet can also cause it. About all you can do is monitor your audio, warm your mics slightly as a preventative measure, and store them with desiccant if they are prone to condensation. The Wildtronics Parabolic Microphones use excess energy from the 48V phantom to heat the internal microphone array and expel moisture, as an additional preventative measure to using mic capsules that already perform well in humid environments. We have not been able to make our mics fail in humid conditions yet.
Other Electrical Problems
Electrical interference from power lines, radio, or electrical equipment may cause buzz, hum, or other artifacts in your audio. These types of noise can almost always be prevented, but some equipment without proper CE approval may not be able to tolerate ESD and the high emissions from cell phones and wireless devices. Wildtronics Microphones use internal shields, RFI filters, differential XLR outputs, high RF immunity amplifier ICs, and proper electronic design techniques to prevent electrical interference. Check your cables for bad connections, unconnected shields, and use balanced XLR type connector systems for longer lengths whenever possible. Unbalanced 3.5mm consumer cables are fine for a few feet, but never meant for more. Ground loop noise and hum can sometimes be cured with an isolation transformer. If long XLR cables are picking up hum which is cured by a transformer, it may indicate that your preamp has poor CMRR, or not high enough Common Mode Impedance. Low Common Mode Impedance is fairly rampant in all price categories of preamps with otherwise “good” specs, but with hidden hum problems. Look for preamp products that use internal transformers, specify a Common Mode Impedance of greater than 1MOhm, or a CMRR of at least 100dB at 60Hz with a 10 Ohm imbalanced source, and you will avoid the poorly designed stuff. Transformers are a tradeoff; they solve CMRR problems, but usually add considerable distortion and reduce input signal handling levels by as much as 20dB. Sometimes, a noisy phantom power source in a lower cost recorder or preamp can be a source of noise. You may not notice it until you try to do low-level recordings. With the Wildtronics Microphones, you can just switch on our internal battery and turn off your phantom power, saving much needed battery life as well.
Summary
Hopefully, this article has helped you understand the important issues concerning noise, sound, how they are specified, and affected by your equipment. This should allow you to make informed decisions about using your equipment and purchasing new equipment. Proper understanding will assist you in getting the most value for your expenditures, and help you avoid overpriced equipment that dealers sell to you based on their markup potential instead of value to you, the customer. Always verify and insist on the product specifications, there is no excuse today for not being able to quantify and relate the technical facts. Be wary of any organization, company, or individual who has no specifications to facilitate your comparisons. Good luck in your endeavors.