Audio Noise Reduction
Tutorial for Removing Noise from Field Recordings
Technique for Eliminating Equipment Noise
People have asked us over the years what is the best technique for reducing background noise from audio recordings. From my experience with recording natural soundscapes for over 20 years, I would like to share my technique for eliminating background equipment noise. Processing and reducing noise should be part of the work flow of editing sounds. With all the technology available today, there is no excuse to hear microphone hiss in any professional recording.
Low Noise Audio Recorder Selection
First, you really need low noise equipment to start with. Processing very noisy recordings will never result in the best sounding final output. A key number to look for in recorders is the EIN (Equivalent Input Noise) specification. This may be a challenge, as many manufacturers do not like listing the spec. You could do an internet search to see if others have measured the recorder of interest. Generally, anything less than -126dBA is good (a larger negative number). The next thing to look for is the A/D specification. The A/D processes the analog signal and converts it to a digital format. Almost all ADC's are now 24bit depth and some newer recorders are 32bit depth, which is great but a little misleading. The specification of interest is the overall SNR (Signal to Noise Ratio). It should be above 100dBA. The higher the better. The absolute best A/D converters can achieve 140dBA SNR, but the overall SNR will be lower. The good news is that today there are many very good recorders available at lower prices than ever. Many low cost, hand held recorders can offer excellent results, even with EINs greater than -126dBA, when paired with products from Wildtronics that have the built-in low noise preamplifiers.
Low Noise Microphone Selection
The noise from a microphone will always be higher than a good recorder's noise floor. So, microphone selection is key to producing a low noise result. Field recording generally involves recording low level sound. When you are recording low levels, microphone self noise starts to become a noticeable issue. How low a noise floor do microphones have to have? A microphone with 16dBA noise floor might be OK if you are using an acoustic amplifier like a parabolic reflector, or recording louder sounds of thunderstorms, creeks, or closeup subjects. If you are recording natural soundscapes, you will want the microphone noise floor to be 10dBA or less. There are not many microphones in that range. Sennhesier makes some omnidirectional mics in that range. Nevaton makes some smaller, 5dBA noise floor mics. Rode and Lewitt makes some cardioid microphones which have 5dBA noise floors, but are challenging to use outdoors due to humidity sensitivity. Wildtronics offers the SAAM system that has less than 8dBA of noise.
Audio Editing Programs
Ok, so you have a decent recorder and a good microphone and want to get that last bit of system noise out of your recordings. Sound editing software is used to process sound files. This software can increase levels, cut, mix, apply effects, and more. It is required software for processing any audio. You will never get a perfect recording straight out of a recorder. It will need processing just like photos need Adobe Lightroom or Photoshop to improve an image for publishing. The most popular software that have noise reduction features are Adobe Audition, WavePad, Sound Forge, and iZotope RX. Each of them are very similar. We will talk about Abobe Audition in particular, but similar processes are available on other programs. WavePad also allows creating and using noise profiles as discussed below and is available for under $100.
Creating Noise Profiles
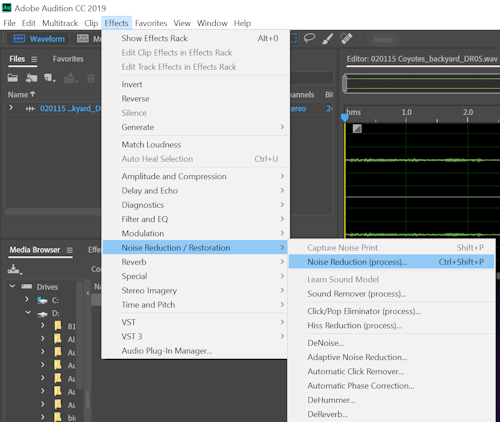
The first step is to capture noise profiles. Set up your recorder and microphones that you will be using in the quietest place you can find. This can be inside an isolated box in the basement or outdoors on a quiet Winter night. Set the gain at the gain levels you would normally use and record for a few minutes. You will need to make a different recording for each recorder and microphone set you normally use. You have just recorded nothing but your system noise. Now import those files into your audio editing software. Open Effects-Noise Reduction/Restoration-Noise Reduction (process). Select the entire file. Click on the button to Capture Noise Print. Now save that noise print as a file that includes the name of your recorder and microphone pair. You can add the gain setting if you like as well. You now have noise profile specific to the equipment you are using.
Noise Reduction Processing an Audio File with the Noise Profile
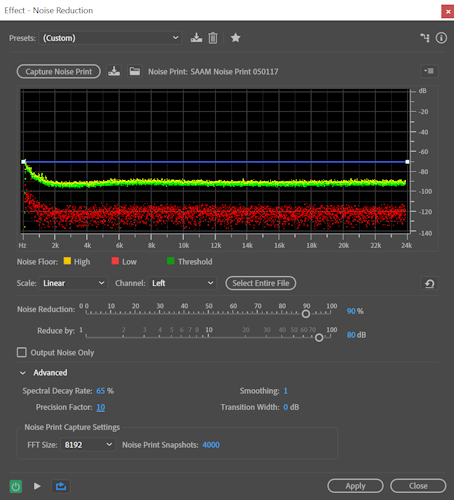
Import your selected raw audio file into your audio editor. First, process your file with amplification or normalization so the peaks are just below 0dB. I like to keep it at -1 to -3dB. This is under Effects-Amplitude and Compression, either Amplify or Normalize (process). Now do your basic editing, like cutting out unwanted sections, applying rumble filters, etc. You could even apply some compression or hard limiting to bring up the level of subtle background sounds. Now open Effects-Noise Reduction/Restoration-Noise Reduction (process). This time, instead of selecting the file, and clicking capture noise print, click the folder icon near the capture noise print button, and open the noise print file you made specific to the recorder and microphone you used. Now that the software has the noise profile of your recording system, you are ready to set up the process. There are some sliders below the spectral display called Noise Reduction and Reduce by. You can start Noise Reduction set at 50% and Reduce by 20dB. In the advanced section, set the spectral decay rate at 65%, precision factor of 10, Smoothing at 1, transition width at 0dB, and the FFT size to at least 8192. Since you are using a noise print of just system noise, you can increase the noise reduction settings way up to near 100% and reduce by 90dB without adding pronounced artifacts to the recording. Be sure to listen to the previews to approve the results. The preview may not play on your computer well when you set the FFT size high. If this is the case, you will have to apply the effect and listen to the resulting file. Listen carefully for any artifacts that can be heard. If you hear odd artifacts, reduce the settings lower until you hear no artifacts. Now hit the Apply button and listen very carefully to the entire recording to see if you really like it. You were now able to reduce your system noise levels by 5-15dB, making your microphones appear like they have a noise floor below 0dB. Note, you will still have environmental noise such as leaf rustle and creek noise that can not be removed without adding lots of artifacts to the recording. That's why it is a good idea to record when there is no wind and away from creeks and rivers. If you want the sounds of a creek in your recording, it may be better to just record only the creek nearby, and then later mix the two files.
Using Noise Reduction Without a Noise Profile
Why don't you just do a noise reduction process on the recording and not mess with all the trouble of creating custom noise profiles? I have tried processing using just noise reduction directly on files. The result is usually inferior because the programs try to reduce noise that is part of the environment, like rustling of leaves and creeks. If you try to reduce noise too much, annoying artifacts will be created in the recording. You can experiment with different settings and also give Adaptive Noise Reduction a try, but you will end of with less total noise reduction when compared to the noise profile method discussed above. Standard noise reduction is benificial, but the noise profile method is superior for low level recordings.
A Sample Using Noise Reduction Techniques
You may listen to a sample recording that has been processed using the noise reduction method with a noise profile. The recording was made using a Wildtronics SAAM and a low cost Sony PCM-M10 hand held recorder. It was a quiet dawn chorus starting out with Whippoorwills. Most of the Whippoorwills were hundreds of yards away. This post processed recording was far better than I could hear with my own ears. Except for this example, our other audio samples do not use any noise reduction, because we are tying to show what the equipment is capable of without noise reduction editing. I hope you found this article helpful in producing better recordings for all your projects.